This page was written to give insight into the gear necessary for cross-country unicycling, for riders and non-riders alike.
Rigging up…
(For 2016 and 2017 I am unable to sew bags for anyone looking for a custom set, but feel free to use what you see. All I ask for is credit on your social media, and a link to my blog.)
I have a 36 inch Kris Holm unicycle with 110/137mm cranks, a Shimano hydraulic disc brake, and a custom welded crossbar with T-handle and custom aero bars. It is un-geared, and I have found out the hard way that it is best to stretch 29 inch mountain bike tubes onto the rim. (Surly 29×3 are best, since the extra thickness can be stretched for my 36×2 7/8 coker tire. Coker name-brand design, 4-ply, so great.)
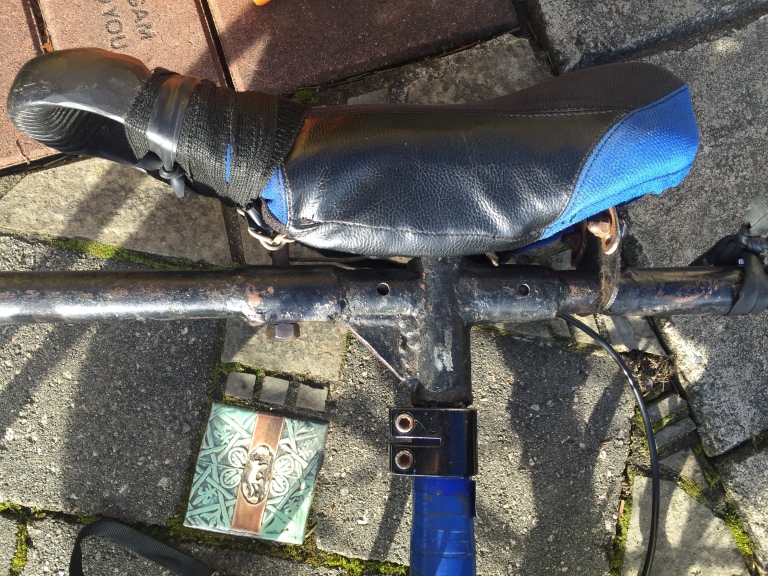
The t-bar was welded with steel, with a triangular plate for the front half. The bottom half of the seat post is a steel pipe welded on to the t-bar. I installed the KH forged, non-adjustable seat stem and cut it to 2 inches, just to keep the seat in position. KH aggressive plate installed to hold the supporting bolt. In the back are removable metal wings bolted onto the t-bar. Ignore the two holes, they’re old.
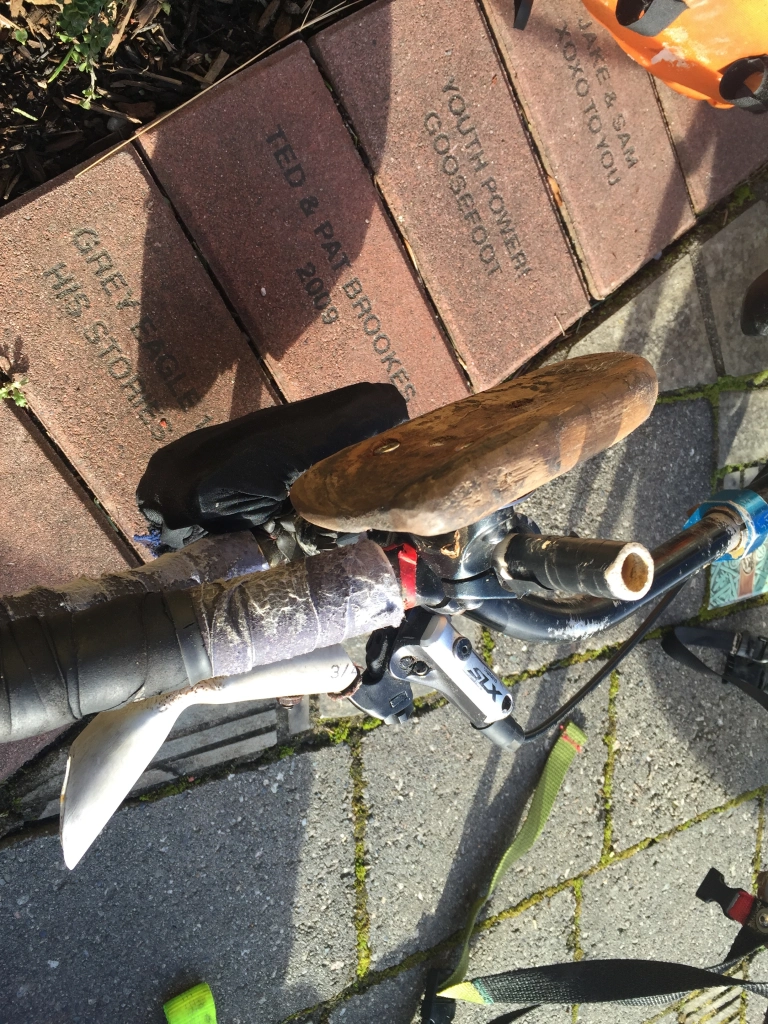
I created a custom set of aero bars, but instead of the carbon fiber or aluminum bars, I used the original removable aluminum handles, shortened to remove the curvature. I then added PVC, heated to mold into shape. The PVC has proven to be sufficiently strong and light, as well as universally available in case of breakage (the handles protrude off the front the most, and are the first things to hit the ground upon falling, so they also protect the bags and brake handle). The plastic pads were replaced with more durable, longer and narrower wooden pieces. I inserted a smaller PVC pipe through the front T handle. This adds a place to attach straps, and also sticks out enough to protect the wooden rests and the bags.


The seat is a KH Air seat, with a couple adjustments. The 20 inch folded tube was replaced with a 16 inch tube from a little girl’s bike, which I found next to a dumpster. (The brake lever was the ONLY thing broken on it – what a pity.) This leaves the front section empty, instead of bulging up into my ‘future children.’ From the innermost layer to the outermost: padding, fleece holster for the air tube, leather cover, seat cover.
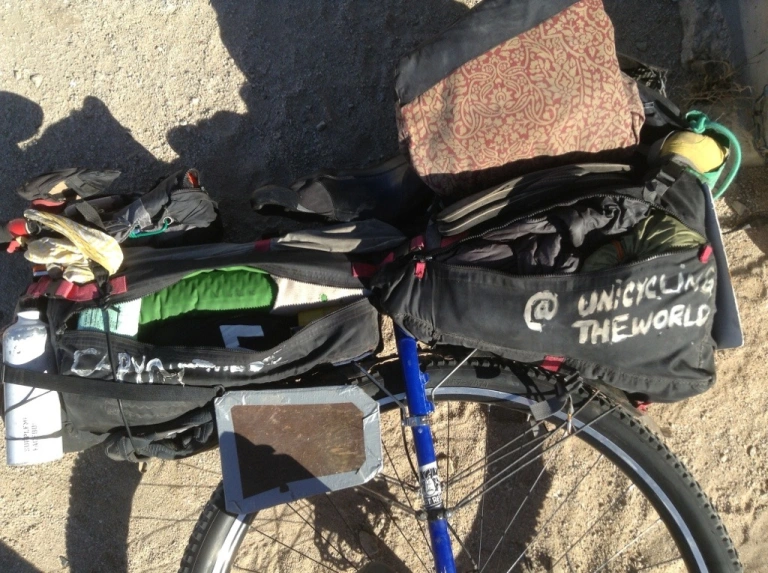
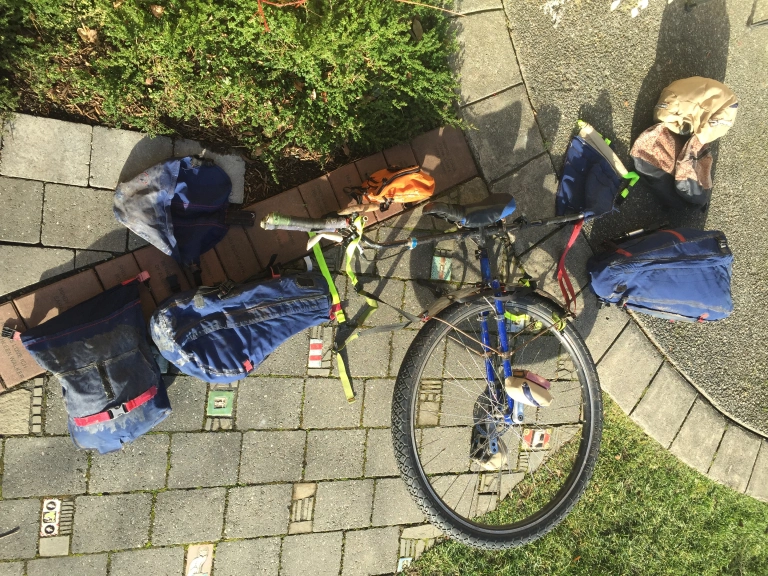
The bags have grown over time, but pack tighter and more efficiently now. Originally, I was faced with the issue of how to attach them and where to even put them (can you make a front pannier? I wondered). The issue was solved by simply sandwiching them between the crossbar and the fender. I welded the fender out of steel to be rigid, bolted it into the underside of the fork, and attached two sets of support rods, which clamp on to the frame (maybe KH frames will have attachment points welded on in the future?). The bags are not rigid, so they must be filled to hold shape. Both bags have reinforced seams, heavy-duty sports zippers (horizontal, full-length, both sides), and adjustable clip-on straps for the crossbar and fender. The rear bag holds a 20 degree sleeping bag and an ultralight 2-person tent. To finish filling, the ground cover and my puffy insulating jacket are stuffed in, and miscellaneous items. The front holds a rolled up air sleeping pad (fills length of bag perfectly, which helps hold shape well.) on top, and below – bag of clothes, pot/bowl/stove/gas, and miscellaneous items like camp towel and spare tubes. The front bag is sewn to be narrow closest to the stem, so that it would fit between my legs. In order to keep the stuffed bag from bulging, 2 thin pieces of wood (masonite, or that wood paneling that peels off your grandma’s 1960s kitchen cabinets) are placed on either side before zipping up. It magically goes from round to square, and the zipped bag is then strapped on the side closer to my seat with two straps, and the enclosed hard plates help everything get cinched together. Good knee clearance, no chafing. Knee braces help, though. Especially during crooked riding days with high winds. Don’t get me started with that…
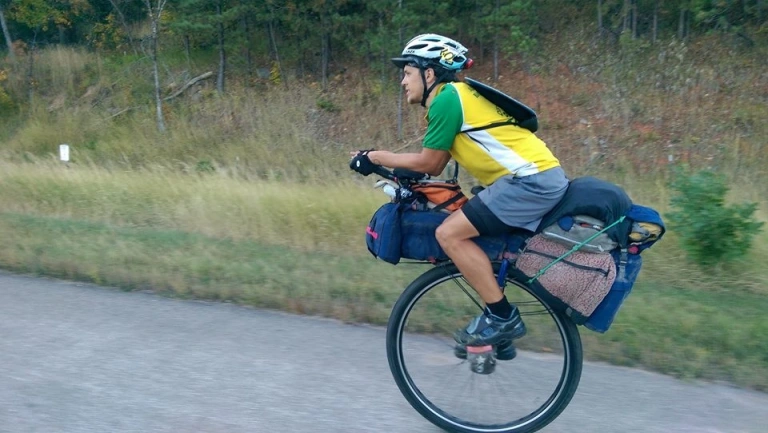
On the back, there originally sat just the box-y grey (now beige) bag. I had my personal seamstress (My mother, bless her heart) attach wing panniers draped off of both sides (red and beige). These act more like classical bicycle panniers – with easy accessibility from either side. Below, these bags clip to the fender support rods. They hold soft things: rainfly, raincoat, long-johns, jacket, spare shorts. They stick out on both sides quite a bit, which makes mounting more challenging, but it not noticeable while riding. In the grey bag goes a 5-liter dry bag with my electronics, and in the side zippers go tools. Atop that, my day pack, in a stuff sack, is clipped down. The zippers face out the opening of the sack, so they are accessible from the rear. My solar panel clips easily on top this setup. The day pack was too much weight for my sore butt, so that’s why it’s clipped on back. But, it can still be worn like a back pack in case of high winds, going on a hike, or stocking up for a couple consecutive meals.

A small, clip-on duffel bag hangs onto the front of the front bag. Wraps and clips just like a dry bag and I store food and dense items up front (to make up for the bulk of the back of unicycle). Along the top left edge of the front pannier are my tent poles, strapped onto the crossbar with the bag. The poles are too long for either pannier, and would bend/break upon falling if they protruded out. On top of the front bag sits my orange “console bag.” It fits between my seat handle and my handles, underneath the aero pads. Inside go daily essentials like sunscreen and anti-chafe cream, as well as phone and wallet. It is strapped directly to the front bag below it. Attached on top is a harness for my kindle (directions and music). There is a never ending supply of abandoned bungee cords along the sides of highways and major thoroughfares. One of the most exciting things I’ve ever found was an red, industrial-sized rubber band (wide and flat like a lasagna noodle, and bigger than a headband). I used it to lock the brake by pulling it tight on the lever before it wore out. I also chock the wheel with my foot, since there’s no real way to stand a loaded unicycle up. It seems one of the most frustrating/challenging things about cross-country unicycling is trying to set it against a wall to access an item. Usually, when it won’t stay upright, I have to tilt it down onto the handles, or back onto the rear bag. Whereas a fully loaded bicycle will lean right against a wall with ease!
Everybody asks me what is hanging off the pedals. They’re bags, and also counterweights. They hold the pedal horizontal, which makes mounting much less dangerous (many times I have to run up a hill or against wind, jump up while lifting the heavy rig, and blindly place my feet on the pedals. But simple weights would have been pointless bulk, so instead they have emergency items like mylar blankets, which don’t need daily accessing.

Watch this video to see me attach all the bags. Keep in mind that this is NOT my daily process while touring. I only do what’s in the second half, as well as actually packing the bags themselves.

saw you ride thru Helena Montana this fall. Tried to catch up with you but you were riding too fast to catch. Hope your still going strong.
John Madsen
Helena Montana